Monday, April 13, 2015

Performance Tuning Tips for Running Spark Applications

Based on what I have read and experimented so far, I have provided some key factors that can impact the performance of Apache Spark applications, specifically spark streamingConcurrency and memory consumption are two key areas that needs careful attention when tuning for performance. The below tips mainly address improving concurrency and reducing memory consumption of spark applications.

Partitions and Concurrency

A spark job consists of several transformations which is broken down into stages that form a pipeline.In the case of Spark Streaming, as data comes in, it is collected, buffered and packaged in blocks during a given time interval - this interval is commonly referred to as "batch interval". When this interval elapses, the collected data is sent to Spark for processing.The data is stored in blocks - these blocks become the RDD partitions. So, the number of tasks that will be scheduled for micro-batch can be expressed as below:

number of tasks = (number of stages) * (number of partitions)


From the above expression, we can see that reducing the number of partitions can have a direct impact on the number of tasks that will be scheduled for computation. However, having too few partitions can lead to less concurrency, which can cause the task to take longer to complete. In addition, having fewer partitions can lead to higher likelihood for data skewness. Thus, the number of partitions can neither be too small nor too high - it has to be balanced. A good lower bound for number of partitions is to have atleast 2 * (# cores in cluster). For example, if you have 100 cores in the clusters, a good starting point for number of partitions is around 200. From there on, you can continue to keep increasing the number of partitions until you can see that you get a good balance of concurrency and task execution time.

Batch Interval and Block Interval

As mentioned earlier, the batch interval refers to the time interval during which the data is collected, buffered by the receiver to be sent to Spark. The receiver sends the data to the executor which manages the data in blocks and each block becomes a partition of the RDD produced during each batch interval.  Now, the number of partitions created in each block interval per consumer is based on the block interval - which is the interval at which data received by Spark Streaming receivers is formed into blocks of data. This interval can be set with this property - spark.streaming.blockInterval.


So, the number of partitions created per consumer can be calculated with this expression:


number of partitions per consumer = batchInterval / blockInterval

Now, the total number of partitions per job is

number of partitions per application = (#consumers) * (batchInterval / blockInterval)

Memory Consumption

This is another important factor that I have seen that can really impact the performance of the application. It is very important to understand the memory consumption of our dataset used for computing and also the cost associated with accessing and disposing the dataset. 

Default Executor Memory

By default, the amount of memory to use per executor process is only 512MB which might not work for most applications dealing with large datasets. This memory is set based on this config property (spark.executor.memory). This property setting can be configured in the properties file (default is spark-defaults.conf) or by supplying configuration setting at runtime in the spark-submit script like below:


./bin/spark-submit --executor-memory 4g


Data Serialization


Because of the in-memory nature of most Spark computations, Serialization plays an important role in the performance of the application. If the data formats that are used in the application are too slow to serialize into objects, it will greatly slow down the computational performance of the application. Spark by default has “Java Serialization” which is very flexible and works with most classes but it is also very slow. We use the Kryo Serialization which uses Kryo library which is very compact and faster than Java Serialization but it does not support all Serializable types. 

You can switch to using Kryo by initializing your job with a SparkConf object. 

conf.set("spark.serializer", "org.apache.spark.serializer.KryoSerializer")

This setting configures the serializer used for not only shuffling data between worker nodes but also when serializing RDDs to disk. Another requirement for Kryo serializer is to register the classes in advance for best performance. If the classes are not registered, then the kryo would store the full class name with each object (instead of mapping with an ID), which can lead to wasted resource.

conf.set("spark.kryo.registrator", com.art.spark.AvroKyroRegistrator");

Spark Kryo Serialization

The scala snippet above shows how to register the avro classes. This will register the use of Avro's specific binary serialization for the Clickstream class


Monday, March 2, 2015

Node.js and Big Data


Node.js is a platform that is built on top of Chrome’s V8 javascript runtime which is ideal for building high performance, scalable and concurrent applications. The main feature of node.js is that it provides a evented, non-blocking I/O with a event loop which makes all IO operations asynchronous. 

node.js architecture


There are some NPM modules available for integrating with the Hadoop ecosystem. The table here shows the modules available for different components like HBase, HDFS, Hive, Solr and Zookeeper. Most of the modules is built on top of the Thrift or REST gateway exposed within each component. 

Node.js Hadoop Big Data Modules
Node.js is a perfect fit for I/O bound processes capable of handling a lot of concurrent requests. I have used these modules (highlighted in orange in the table above) in several use cases.

Tuesday, February 17, 2015

Configuring Cloudera Search to use local directory indexes

If you are using Cloudera Search, the SOLR collections that are created using Solrctl commands create collections that are backed in HDFS (org.apache.solr.core.HdfsDirectoryFactory) by default. If you want certain collections to use local indexes instead, then you can do the following:

1. Log in to one of the SOLR nodes and generate a new instance directory locally using the solrctl command:


solrctl instancedir —generate collectionConfigDir

The above command will generate the folder 'collectionConfigDir' with default configuration
2. Open the solrconfig.xml in the editor and make the following changes:

  • Comment out the section related to <directoryFactory> - The default generated config uses the HDFSDirectoryFactory. We can add a new section for the directoryFactory to use solr.NRTCachingDirectoryFactory


<directoryFactory name="DirectoryFactory" class="solr.NRTCachingDirectoryFactory">
</directoryFactory>

<!--  <directoryFactory name="DirectoryFactory" class="org.apache.solr.core.HdfsDirectoryFactory">
    <str name="solr.hdfs.home">${solr.hdfs.home:}</str>
    <str name="solr.hdfs.confdir">${solr.hdfs.confdir:}</str>
    <str name="solr.hdfs.security.kerberos.enabled">${solr.hdfs.security.kerberos.enabled:false}</str>
    <str name="solr.hdfs.security.kerberos.keytabfile">${solr.hdfs.security.kerberos.keytabfile:}</str>
    <str name="solr.hdfs.security.kerberos.principal">${solr.hdfs.security.kerberos.principal:}</str>
    <bool name="solr.hdfs.blockcache.enabled">${solr.hdfs.blockcache.enabled:true}</bool>
    <int name="solr.hdfs.blockcache.slab.count">${solr.hdfs.blockcache.slab.count:1}</int>
    <bool name="solr.hdfs.blockcache.direct.memory.allocation">${solr.hdfs.blockcache.direct.memory.allocation:true}</bool>
    <bool name="solr.hdfs.blockcache.direct.memory.allocation">false</bool>
    <int name="solr.hdfs.blockcache.blocksperbank">${solr.hdfs.blockcache.blocksperbank:16384}</int> 
    <bool name="solr.hdfs.blockcache.read.enabled">${solr.hdfs.blockcache.read.enabled:true}</bool>
    <bool name="solr.hdfs.blockcache.write.enabled">${solr.hdfs.blockcache.write.enabled:true}</bool>
    <bool name="solr.hdfs.nrtcachingdirectory.enable">${solr.hdfs.nrtcachingdirectory.enable:true}</bool>
    <int name="solr.hdfs.nrtcachingdirectory.maxmergesizemb">${solr.hdfs.nrtcachingdirectory.maxmergesizemb:16}</int>
    <int name="solr.hdfs.nrtcachingdirectory.maxcachedmb">${solr.hdfs.nrtcachingdirectory.maxcachedmb:192}</int>
  </directoryFactory> 
-->
  • Specify the solr data directory to use a local directory on the server. Also, ensure that the folder exists with required write permissions for the user running solr.

<!-- <dataDir>${solr.data.dir:}</dataDir>-->
<dataDir>/solr</dataDir>

  •  Change the lock type to use 'simple' instead of 'hdfs', which is set using this property 'solr.lock.type'

      <!--<lockType>${solr.lock.type:hdfs}</lockType>-->
 <lockType>simple</lockType>
3. Once these changes are done, then the instance directory can be uploaded as a new configuration to zookeeper using the following command

solrctrl instancedir --create collectionConfig collectionConfigDir

4. Now, the new collection can be created which will start using the local directory for storing the indexes.

solrctl collection --create newCollection -c collectionConfig -s 1 -r 2

The above command will create a collection (with 1 shard and 2 replicas) that will use local directory (/solr) for storing the indexes

Sunday, February 15, 2015

Near Line Search Indexing using Hbase, Lily Indexer and Cloudera Search (SOLR)

In this blog post, I will be explaining how to implement near "Large Scale Near Line Search Indexing" using HBase and SOLR. This is a common scenario that is applicable in different use cases where you have large volumes (and on-going) of content updates that needs to be pushed in to live search indexes and the content should be instantly (near real-time) searchable. In addition, the content that needs to be stored and indexed might be unstructured or could be large enough that existing RDBMS solutions would not scale. 

In such a situation, the master content could reside in a distributed key value columnar NOSQL store like HBase which provides horizontal scalability. For example, let's say that you have a high throughput website which gets a lot of new user generated content that you want to make it searchable. In these cases, you need a store that can support massive scale and also allows for flexible schema evolution. HBase lends itself well for these kind of usecases as it offers a distributed solution with extreme scalability and high reliability.

In this implementation, we will use Lily HBase Indexer to transform incoming HBase mutations to SOLR documents and update live SOLR indexes.

About Lily HBase Indexer


The Lily HBase Indexer Service is a fault tolerant system for processing a continuous stream of HBase cell updates into live search indexes. It works by acting as an HBase replication sink. As updates are written to HBase region servers, it is written to the Hlog (WAL) and HBase replication continuously polls the HLog files to get the latest changes and they are "replicated" asynchronously to the HBase Indexer processes. The indexer analyzes then incoming HBase cell updates, and it creates Solr documents and pushes them to SolrCloud servers.

Lily Hbase Indexer

The configuration information about indexers is stored in ZooKeeper. So, new indexer hosts can always be added to a cluster and it enables horizontal scalability

Installing and Configuring Lily Hbase Indexer

Installing the lily Hbase indexer in your cluster is very easy. If you are using a distribution like Cloudera (CDH), the Lily Hbase indexer is already included in the CDH parcels. If not, then the package can be downloaded, built and installed from Lily Hbase Indexer website. Please check here for installation steps if you want to do it manually.

Configuring Hbase Indexer

The Lily hbase indexer services provides a command line utility that can be used to add, list,  update and delete indexer configurations. The command shown below registers and adds a indexer configuration to the Hbase Indexer. This is done by passing an index configuration XML file alsong with the zookeeper ensemble information used for Hbase and SOLR and the solr collection. 

Hbase-indexer add-indexer
--name search_indexer
--indexer-conf /.search-indexer.xml
--connection-param solr.zk=ZK_HOST/solr
--connection-param solr.collection=search_meta
--zookeeper ZK_HOST:2181

The XML configuration file provides the option to specify the Hbase table which needs to be replicated and a mapper. Here we use morphline framework again to transform the columns in the hbase table to SOLR fields and we pass the morphline file which has the pipeline of commands to do the transformation

<indexer table=“search_meta” mapper="com.ngdata.hbaseindexer.morphline.MorphlineResultToSolrMapper" mapping-type="row" unique-key-field="id" row-field="keyword">
<param name="morphlineFile" value="morphlines.conf"/>
</indexer>

The Param name=”morphlineFile” specifies the location of the Morphlines configuration file. The location could be an absolute path of your Morphlines file, 

Enabling HBase Replication

Since the HBase Indexer works by acting as a Replication Sink, we need to make sure that Replication is enabled in HBase. You can activate replication using Cloudera Manager by clicking HBase Service->Configuration->Backup and ensuring “Enable HBase Replication” and “Enable Indexing” are both checked.

In addition, we have to make sure that the column family in the HBase table that needs to be replicated must have replication enabled. This can be done by ensuring that the REPLICATION_SCOPE flag is set while the column family is created, as shown below:

create ‘searchTbl’, {NAME => ‘meta’, REPLICATION_SCOPE => 1}


About Morphlines

Morphline provides a simple ETL framework for Hadoop applications. A morphline is a configuration file that makes it easy to define a transformation chain that consumes any kind of data from any kind of data source, processes the data and loads the results into a Hadoop component. Morphlines can be seen as an evolution of Unix pipelines where the data model works with streams of generic records defined by transformation commands based on a config file. Since Morphlines is a java library, it can also be embedded in any Java codebase. Here, we use it to transform the HBase cell updates and map them to fields in SOLR.

Using Morphines in HBase Indexer

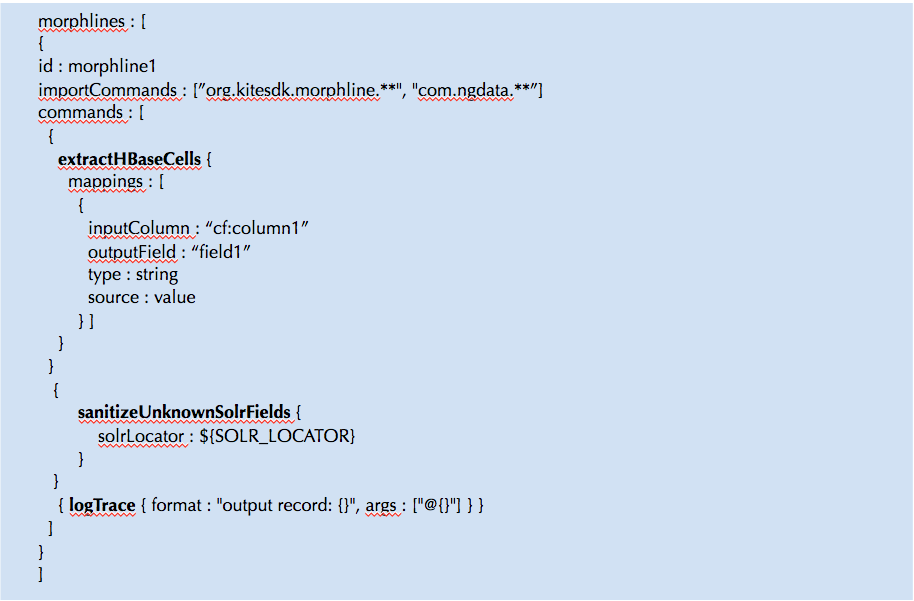
I’m just showing here a very basic morphline file where the first command is extractHbaseCells which is a morphline command that extracts cells from an HBase Result and transforms the values into a SolrInputDocument. The command consists of an array of zero or more mapping specifications.. We can list an array of such mappings here. The parameters for the mapping are:
  • inputColumn – which specifies columns to which to subscribe
  • outputFied – the name of the field where the data is sent
  • type – the type of the field
  • source –  value specifies that the cell value should be indexed
The second command is to sanitizeunknown fields from being written to SOLR . The mapper that we used MorphlineResultToSolrMapper has the implementation to write the morphline fields into SOLR documents


Morphline in Hbase Indexer

Morphline support for Avro

Morphline comes with some handy utilities for reading and writing Avro formatted objects. This can be combined with the extractHbaseCells command to transform a kite avro formatted dataset persisted in Hbase as byte arrays. The readAvroContainer command Parses an Apache Avro binary container and emits a morphline record for each contained Avro datum.

The Avro schema that was used to write the Avro data is retrieved from the Avro container.  The byte array is read from the first attachment of the input record. We can then use the extractAvroPaths command to extract specific values from an Avro object as shown in the example below:


Morphline Avro Hbase Indexer

The above snippet shows how you can transform avro formatted data written in HBase and map them to SOLR fields.

Setting up SOLR schema

In order to send the HBase mutations to fields in SOLR documents, we have to make sure the following setup is done:
  • Setup the collection in SolrCloud or Cloudera Search
  • Setup the field names in schema.xml


You can check this link to read on understanding how solr documents are modeled.

Once the solr collections are created, the Hbase indexer process can be started and you can see the Hbase mutations replicated and live solr indexes get updated (in near real time).

Friday, February 13, 2015

Implementing Real Time Trending Engine on Clickstream data using Flume and Spark Streaming


In this blog post, I will be explaining one of the approaches for implementing a scalable real time stream processing engine that can provides trend aggregations using clickstream data. This could address use cases where you need the ability to provide real time trends on user activity on a website or mobile app. An engine like this would allow us to compute trend aggregations for scenarios like top products being added to cart or top searches or category pages that were visited. 

A stream processing pipeline and engine should be able to compute aggregations based on a configurable sliding window of data so that trends can be recomputed at set intervals based on sliding window of time (with low latency). I'm going to explain an approach for implementing a trend engine that works on consuming clickstream events using technologies like Apache Flume, Kite Morphlines, Spark Streaming, Rabbitmq, Node.js and Socket.IO. Below is a diagram that shows a high level architecture of the different components of the stack.


STREAM PROCESSING PIPELINE


In this approach, we will use Apache Flume for ingesting the clickstream data from the web clients. The client transmits the events into an Avro Source. The source that is receiving the event passes the event through the source interceptors where the event is transformed into a clickstream avro record using the kite Morphlines ETL framework. You can read my other blog post that talks in detail about how to ingest clickstream data using Flume and process it using Kite Morphines

Once the flume agent has been configured to ingest the clickstream events and processed using Morphines to create avro records that corresponds to a Kite Dataset, the event is fanned out to two different channels. Each channel is connected to a sink which drains the events from their respective channel. In this case, one sink is the HDFS sink which writes the avro records into HDFS as kite dataset that is used for clickstream analytics, while the other channel is configured to connect to a Spark Sink which is a custom flume sink where events get buffered for consumption by the Spark engine. 

Spark Streaming which is an extension of the Spark Core API for large scale stream processing from live datastreams. In this approach, Spark streaming uses a reliable Flume receiver to pull data from the sink and the trend aggregates are computed as a series of small batch programs. The computed trend summaries are then written to a Rabbitmq exchange. Then, a node aggregation process that subscribes to messages from the queue and creates a trend object in JSON. This trend object is then broadcasted to all clients via socket.io. Socket.io is a library that enables real-time bidirectional event based communication via websockets. This way the UI module on the websites get automatically updated with new trend information as they happen without requiring a page refresh or a periodic poll to the server. 

Now, let’s look at the key components in this stack in more detail.In this real-time trending platform, I'm using Apache Spark for building the stream processing engine. 


Apache Spark

Spark is a fast and general purpose cluster computing engine that leverages distributed memory. It has well defined and clean APIs available in multiple languages which can be used to write programs in terms of transformations on distributed datasets. It uses a data abstraction called RDDs which stand for resilient distributed datasets which is a collection of objects spread across a cluster stored in memory. RDDs are built through parallel transformations and can be automatically rebuilt on failure and thus provides linear scalability and fault tolerance. It also seamlessly integrates with the rest of the hadoop ecosystem both in terms of data compatibility and deployments Spark supports different deployment models – it can run on YARN, MESOS or a standalone mode. Plus, it comes with great libraries for machine learning, streaming processing, SQL engine and graph computations.
Apache Spark Architecture

Spark Streaming

Spark Streaming is an extension of the core Spark API that enables scalable, fault-tolerant stream processing of live data streams. Data can be ingested from many sources like Flume, Kafka or TCP sockets and can be processed using different kinds of algorithms . Finally, processed data can be pushed out to HDFS or databases. You can also use algorithms from other libraries included in  Spark (like MLlib).
Spark Streaming Dstream
Internally, Spark Streaming receives live input data streams and divides the data into batches, which are then processed by the Spark engine to generate the final stream of results in batches. Spark Streaming provides a high-level abstraction called  DStream, which represents a continuous stream of data. and internally they are represented as a sequence of RDDs.


Spark Sink

In order send the clickstream events to Spark Streaming, we use a custom spark sink. This spark sink uses a pull based approach – where event in the sink gets buffered. Spark streaming uses a reliable flume receiver to pull data from the sink using transactions. The transactions succeed only after the data is received and replicated by spark streaming. This ensures strong reliability and guarantees fault tolerance. In order to configure this custom sink, the custom sink needs to be downloaded and be available on the Flume agent’s classpath. Then in the flume configuration, we specfiy the type to be Sparksink.

The maven artifact details on the Sink is provided here:

Flume Agent Configuration

The Flume Agent has to be configured to listen to the avro source where the clickstream events are emitted and it has be configured to deliver the events to the two sinks via different channels. In addition, the source interceptors (Morphlines in this case) have to be attached to the avroSource.A sample flume agent configuration file is provided below:


clickstreamAgent.channels = mem-channel-hdfs mem-channel-avro
clickstreamAgent.sources = avroSource
clickstreamAgent.sinks = clickstream-dataset clickstream-avro-tier

clickstreamAgent.channels.mem-channel-avro.type = memory
clickstreamAgent.channels.mem-channel-avro.capacity = 10000
clickstreamAgent.channels.mem-channel-avro.transactionCapacity = 10000

clickstreamAgent.channels.mem-channel-hdfs.type = memory
clickstreamAgent.channels.mem-channel-hdfs.capacity = 10000
clickstreamAgent.channels.mem-channel-hdfs.transactionCapacity = 10000

clickstreamAgent.sources.avroSource.type = avro
clickstreamAgent.sources.avroSource.channels = mem-channel-hdfs mem-channel-avro
clickstreamAgent.sources.avroSource.bind = $HOST_NAME
clickstreamAgent.sources.avroSource.port = $PORT_NUMBER
clickstreamAgent.sources.avroSource.interceptors = attach-schema morphline

# add the schema for our record sink
clickstreamAgent.sources.avroSource.interceptors.attach-schema.type = static
clickstreamAgent.sources.avroSource.interceptors.attach-schema.key = flume.avro.schema.url
clickstreamAgent.sources.avroSource.interceptors.attach-schema.value = file:/etc/flume-ng/schemas/clickstream.avsc

# morphline interceptor config
clickstreamAgent.sources.avroSource.interceptors.morphline.type = org.apache.flume.sink.solr.morphline.MorphlineInterceptor$Builder
clickstreamAgent.sources.avroSource.interceptors.morphline.morphlineFile = /etc/flume-ng/conf/morphline.conf
clickstreamAgent.sources.avroSource.interceptors.morphline.morphlineId = convertClickStreamLogsToAvro

# store the clickstream in the avro Dataset
clickstreamAgent.sinks.clickstream-dataset.type = hdfs
clickstreamAgent.sinks.clickstream-dataset.channel = mem-channel-hdfs
# the partitioned directories must match the dataset's partition strategy
clickstreamAgent.sinks.clickstream-dataset.hdfs.path = /data/clickstream/year=%Y/month=%m/day=%d/hour=%H
clickstreamAgent.sinks.clickstream-dataset.hdfs.batchSize = 10000
clickstreamAgent.sinks.clickstream-dataset.hdfs.fileType = DataStream
clickstreamAgent.sinks.clickstream-dataset.hdfs.useLocalTimeStamp=true
clickstreamAgent.sinks.clickstream-dataset.serializer = org.apache.flume.sink.hdfs.AvroEventSerializer$Builder

# store the clickstream in the avro sink for the tiered collection 
clickstreamAgent.sinks.clickstream-avro-tier.type = org.apache.spark.streaming.flume.sink.SparkSink
clickstreamAgent.sinks.clickstream-avro-tier.channel = mem-channel-avro
clickstreamAgent.sinks.clickstream-avro-tier.hostname = $SINK_HOST
clickstreamAgent.sinks.clickstream-avro-tier.port = $SINK_PORT
clickstreamAgent.sinks.clickstream-avro-tier.batch-size = 1


Polling Flume Receiver

As I had mentioned earlier, Spark Streaming provides a polling receiver to extract events from Spark Sink. The below code shows how to create a DStream object which contains continuous stream of events from Flume


 // Create the context and set the batch size
 val sparkConf = new SparkConf().setAppName("TrendAnalyzer")
 // Create the Spark StreamingContext for the configured batch interval
 val ssc = new StreamingContext(sparkConf, batchInterval)
  
 // Create a data stream using the polling receiver
 val stream = FlumeUtils.createPollingStream(ssc, host, port)
 val windowStream = stream.window(windowInterval)

Running Spark on YARN

Spark supports pluggable cluster management and can run as either standalone or on YARN or mesos. Running Spark on YARN has several advantages if you already have a Hadoop cluster. One of the main reason is to leverage the same hadoop cluster hardware This leads to better utilization of the cluster and also eliminate the cost of maintaining a separate cluster. Also, we can take advantage of the features of the YARN scheduler for categorizing, isolating and prioritizing workloads. Spark on YARN cluster

Spark can be run in YARN under two modes – a cluster mode and a client mode. The cluster mode is suitable for production deployments where the Spark driver runs inside an application master process which is managed by YARN on the cluster, so that the client can go away after initiating the application. In yarn-client mode, the driver runs in the client process, and the application master is only used for requesting resources from YARN. This is useful when you need the spark shell interactivity or for debugging purposes.

A word on Data Serialization

Because of the in-memory nature of most Spark computations, Data Serialization plays an important role in the performance of the application. Spark by default has “Java Serialization” which is very flexible and works with most classes but it is also very slow. Spark also supports Kryo Serialization which uses Kyro library which is very compact and faster than Java Serialization. You can switch to using Kryo by initializing your job with a SparkConf and calling conf.set("spark.serializer", "org.apache.spark.serializer.KryoSerializer"). This setting configures the serializer used during both shuffling and also when serializing RDDs to disk. Another requirement for Kyro serializer is to register the class in advance for best performance.The scala snippet here shows how to register the avro classes. This will register the use of Avro's specific binary serialization for the Clickstream class


Monday, June 30, 2014

Spark Installation Steps on CDH4 using Cloudera Manager

In this post, I will explain the steps to follow for installing Apache Spark on CDH4 cluster using Cloudera Manager. Apache Spark is a fast and general purpose fast cluster computing system with an advanced DAG execution engine that supports in-memory computation.


APACHE SPARK VERSION

As of now, the version of Spark that is packaged within CDH4 and CDH5 is 0.9. Spark 1.0 is packaged inside CDH 5.1 release which is expected to be released soon.


INSTALLATION USING PARCELS

When using CDH, it is recommended to use "Parcels" for deploying and installing packages. Parcels provide an alternative binary distribution format supported in Cloudera Manager which makes downloading, distributing and deploying and maintaining the packages much simple and easier. To learn more about parcels, click here.

In CDH5, Spark is included within the CDH parcel. However, in CDH4, you have to install CDH and Spark using separate parcel. Follow the steps below to configure, download and distribute the parcel required for Spark:
  • In the Cloudera Manager Admin Console, select Administration -> Settings.
  • Click the Parcels category.
  • Find the Remote Parcel Repository URLs property and add the location of the parcel repository (http://archive.cloudera.com/spark/parcels/latest).
  • Save Changes and click on "check for new parcels"
  • The parcel for Spark (e.g: SPARK 0.9.0-1.cdh4.6.0.p0.98) should appear. Now, you can download, distribute, and activate the parcel across the hosts in the cluster using Cloudera Manager.


MASTER NODE SETUP

Log on to the node that will run as the Spark Master role and perform the following configuration as the root user from the command line.
  • Edit /etc/spark/conf/spark-env.sh file
    • Set the environment variable STANDALONE_SPARK_MASTER_HOST to the fully qualified domain name (eg: masternode.abc.com) of the master host.
    • Uncomment and Set the environment variable DEFAULT_HADOOP_HOME to the Hadoop installation path (/opt/cloudera/parcels/CDH/lib/hadoop)
    • Few other key environment variables that can optionally be changed are given below:
Environment Variable
Description
SPARK_MASTER_IP
Binding the master to a specific IP address
SPARK_MASTER_PORT
Start the master on a different port (default: 7077).
SPARK_MASTER_WEBUI_PORT
Spark master web UI port (default: 8080).
SPARK_MASTER_OPTS
Configuration properties that apply only to the master
  • Edit the file /etc/spark/conf/slaves and enter the fully-qualified domain names of all Spark worker hosts
# A Spark Worker will be started on each of the machines listed below
worker1.abc.com
worker2.abc.com
worker3.abc.com

WORKER NODES SETUP

Copy the contents of /etc/spark/conf/ folder from the master node to all the worker nodes


Starting/Stopping Services

Master Node - Start the Master role on the Spark Master host using the following:
/opt/cloudera/parcels/SPARK/lib/spark/sbin/start-master.sh

Worker Nodes  - There is a start-slaves.sh that can be run from the master to start all worker nodes. However, this requires password-less SSH configured for root, which I wouldn't recommend. Instead, you can start the worker process from each worker node by running the following command:
nohup /opt/cloudera/parcels/SPARK/lib/spark/bin/spark-class org.apache.spark.deploy.worker.Worker spark://<<master>>:7077 &

Note above that the spark master node must be provided appropriately - for me, it only worked without the domain name.

Once the master and worker processes is started, you can verify if they are running correctly by going to the Spark Master Web UI @ http://<master-node>:18080 and you can see the master status and all the worker processes running. You can also type in "spark-shell" in the command line of any worker node to start using the built-in Spark shell.

If you need to stop the master, run the following command:


/opt/cloudera/parcels/SPARK/lib/spark/sbin/stop-master.sh

Happy Sparking!

Sunday, June 15, 2014

Performance Tuning and Optimization for Cloudera Search


In this post, I will explain some of the key factors that should be considered while optimizing performance (for querying and indexing) on implementations using Cloudera Search. Since Cloudera Search is built on top of SolrCloud, most of the performance considerations that are applicable for SOLR applications are still applicable for Cloudera Search. Please refer to this link for an overview of the main factors that affect SOLR performance (in general).

Below are some of the main factors that I found useful while optimizing performance on Cloudera Search

Block Caching
As we know, Cloudera Search uses HDFS filesystem to store the indexes. In order to optimize the performance, HDFS Block cache option is available. The block cahce works by caching the HDFS index blocks in JVM direct memory. Block cache can be enabled in solrconfig.xml. Below are the key parameters involved in tuning the block cache:

1. Enable Block Cache - by setting solr.hdfs.blockcache.enabled  to be true. Once block cache is enabled, the read and write caches can be enabled/disabled separately through the following settings:
  • solr.hdfs.blockcache.read.enabled
  • solr.hdfs.blockcache.write.enabled
 There is a known issue with enabling block cache writing which may lead to irrevocable corrupt indexes. So, it is very important that this is disabled by setting solr.hdfs.blockcache.read.enabled to be false.

2. Configure Memory Slab Count - The slab count determines the number of memory slabs to allocate, where each slab is 128 MB. Allocate the slab count to a sufficiently higher number that is required for the specific application (based on schema and query access patterns)
This is done by setting the solr.hdfs.blockcache.slab.count parameter

3.  Enable Global Block Cache - Enabling the global block cache would allow multiple solrcores on the same node to share a global HDFS block cache. It is done by setting solr.hdfs.blockcache.global to be true

4. NRTCachingDirectory - If using the Near Real-Time (NRT) setup, then enabling the NRTCachingDirectory (solr.hdfs.nrtcachingdirectory.enable) and tuning the maxCachedmb (solr.hdfs.nrtcachingdirectory.maxcachedmb) and merge size (solr.hdfs.nrtcachingdirectory.maxmergesizemb) thresholds also help.

Below is the xml section (in solrconfig.xml) with the above parameters:


<directoryFactory name="DirectoryFactory" class="solr.HdfsDirectoryFactory">
  <bool name="solr.hdfs.blockcache.enabled">true</bool>
  <bool name="solr.hdfs.blockcache.read.enabled">true</bool> 
  <bool name="solr.hdfs.blockcache.write.enabled">false</bool>
  <int name="solr.hdfs.blockcache.slab.count">100</int>
  <bool name="solr.hdfs.blockcache.direct.memory.allocation">true</bool>
  <int name="solr.hdfs.blockcache.blocksperbank">16384</int>
  <bool name="solr.hdfs.nrtcachingdirectory.enable">true</bool>
  <int name="solr.hdfs.nrtcachingdirectory.maxmergesizemb">64</int>
  <int name="solr.hdfs.nrtcachingdirectory.maxcachedmb">1024</int>
</directoryFactory>


SolrCloud Caching
The caching related settings play a major role in influencing the query performance/response time. Since SOLR caching are based on the Index Searches, the caches are available as long as the searchers are valid. Solr has support for FastLRUCache which has faster reads which can be set via (Solr.FastLRUCache) in  solrconfig.xml file. There are 3 types of caching available in SOLR

FilterCache - This cache stores unordered sets of document IDs matching the queries. It stores the results of any filter queries (fq) by executing and caching each filter separately. Setting this cache to sufficiently higher value helps in caching commonly used filter queries. Below is a sample configuration for the filter cache:

QueryResultCache - This cache stores the top N results of a query. Since it stores only the document IDs returned by the query, the memory usage of this cache is less compared to that of the filterCache.

DocumentCache - This cache stores the Lucene Document objects that have been fetched from disk. The size of the documentCache memory is dependent on the number and type of fields stored in the document.

Below is a sample configuration setting for the above three cache types:

<filterCache class="solr.FastLRUCache"
                 size="20000"
                 initialSize="5000"
                 autowarmCount="1000"/>

<queryResultCache class="solr.FastLRUCache"
                     size="10000"
                     initialSize="5000"
                     autowarmCount="1000"/>

<documentCache class="solr.FastLRUCache"
                   size="5000"
                   initialSize="2000"
                   autowarmCount="1000"/>

Disable Swapping
As with other hadoop systems, it is recommended to disable Linux swapping on all solr nodes.

To get more details on tuning Cloudera Search, please refer to this link